 It’s the good ol’ days, back when I was in Junior High, full of spunk because we just got a new color monitor and ditched the Amber Screen that we opted for over the standard green with our XT. Good times… Good Times! Now you too can relive the glory days of computing, be transported back to the Tombstone of the OS wars, and let your cup runeth over with the bliss we all felt with the release of Windows 3.1.
Install Windows 3.1 with Virtual PC
Virtual PC has been around a while, and has become quite stable and an excellent resource to have as a developer of any kind. It’s far better to hose a virtual machine than your daily production box. Since Deep Pockets Billy has seen fit to make Virtual PC free to the world, there’s no reason to not download it and give it a whirl. It’s a small executable, and runs pretty tightly. It literally takes seconds to install, and mere minutes to configure a new Virtual Machine.
Once VPC is installed and working, Click New.. and get going. Click next through the welcome screen, and select Create a virtual machine. The options here are well explained and easy to decipher, if you already have a .vmc file – then use it; if not create a new one. Click Next >.
Now give it a name, and a home. Just use the default location on your c drive; it creates a My Virtual Machines directory in your My Documents folder – so unless you have a 20 gb drive, default is fine. Since I used it to install Windows 3.1, that’s what I named it; Windows3.1. Again with the Next >.
Now you get to choose the operating system, notice that Windows 3.1 is strangely absent from the list…. so here we select Other. Yup, click Next >.
For the RAM allocation I left it at default which is 128mb. Now you come to the Virtual Hard Disk options. This is the bit that actually holds the data for your Virtual Machine. Since we are not adding an existing one, Select A new virtual hard disk and click Next >. Now select the same location as the.vmc file, unless you intend on giving it a truck load of space, then by all means place it on a secondary local drive. I would also take note of the Enable undo disks. This can be helpful if you are doing any development that could frag your VHD. This could save a bit of time and hassle, since you might be able to recover your disk from a previously un-fubared version. For my purposes I set the hard disk size to 650 mb. Click Next > & Finish.
That’s it. You just created a new virtual machine. Now just select it, Start it and install your OS normally.
Where’s the beef?
To make it easier, and since I am pretty sure it needed to be there first, I installed DOS 6.22 onto the partition. Again, Microsoft has graciously made DOS 6.22 available for a free download. One thing to keep in mind if you have to download the disks, and don’t have the OEM disks – the disk labels must use all of the available 11 characters, so the labels must be DISK 1, DISK 2, DISK 3 – or the install will not work. There are 6 spaces between the word DISK, and the disk number. As I have original disks, I didn’t need to do this.
I should also say it took me a while to get to this point. I tried to get a clean install of Windows 3.1 onto a laptop, and failed. The drive wouldn’t read the DOS disks, or the VGA driver failed install, or the DOS boot disk wouldn’t work or some other damned thing. It took me a bit to wade through all the muck and get this to the final end point of Virtual PC. Thanks to Scott for some tips, and various other sites and blogs.
 Once I got the disks stuffed into the drive (it helps to if your floppy drives works properly, and actually reads the disks) DOS installed quick and easy – I mean what could really go wrong? It’s only 3 3.5 inch floppies… Next Up Windows, Disco ball version. Okay, not quite that old – but you get the idea.
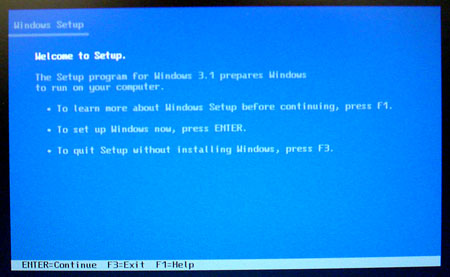
The first thing that really struck me as I started to install Windows, was that the flippin’ setup window is almost exactly the same as it is today for installing Windows XP. I don’t remember if it is or not for Vista, but since companies like Lenovo is recommending a downgrade, I’m not terribly likely to refresh my memory any time in the foreseeable future. The DOS setup screen isn’t a whole lot different either, but it didn’t hit me until I started the Windows install.
Not too much to say here either, I had little trouble with this 6 floppy swapping install – in fact this time around I had no file failures. The first time one of the fonts was unreadable and I had to set the display to Super VGA instead of VGA.
Run, Forest run!
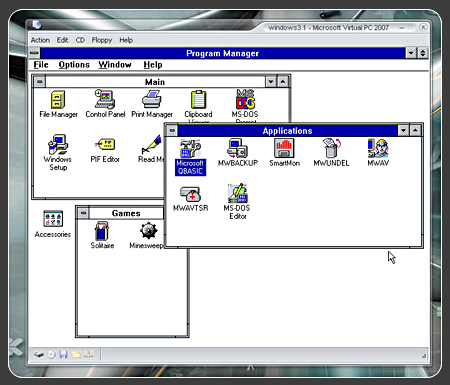
Let’s see… it’s been what? 20 minutes? That’s about it. Now you are set and get to kick it in the retro OS world of Windows 3.1. It just slays me in fact – this is a riot. I’m a geek and I know it – and if I didn’t my wife would be sure to remind me. Naturally it runs screaming fast, in fact it took like 5 seconds for it to load. Man! How nice would that be with XP? I’m not really sure what exactly I did this for other than it seemed like the thing to do – but there it is.
If you want to get more stuff for your new toy, check out oldOS.org for Windows 3.1 downloads.